In this post, we will talk about how to understand the risks involved and manage Website Permissions to stay safe and protect your privacy online. It’s pretty easy actually. With just a few little changes in Chrome, you can easily manage the permissions you have given to each website.
How to manage Website Permissions in Chrome
With just a little tweak in your Chrome browser settings, you can manage the website permissions. Open Chrome on your PC and go to the three dots menu on the top right corner of your browser. Go to the Settings section.
Chrome will then open a new page of settings with various sections. Go to the Privacy and Security section in the left panel. Scroll down and go to Site Settings in the right panel.
Here you can see the permissions you have granted to various websites and also can change the settings for further management. When you click on the option saying, “View permissions and data stored across the sites”, it will open the whole list of websites storing your data. Trust me, you will be shocked to see how many websites actually have your permission to store your data. I myself was shocked when I checked it while writing this post. Intentionally and sometimes unintentionally, we give so many websites to store our data which is not safe at all. Well, now that you know about the websites having your permissions, you can clear the data and reset the permissions from here. You can clear the entire data by clicking on the Clear Data button too. When you clear data for a website, you will be logged out from the site and all your offline data will be cleared.
If you don’t want to clear the data, you should at least check and “Reset Permissions”. Click on the tiny arrow in front of the website and you will see the options to reset permissions. Here, you can also check the permissions you have already given to a certain website and reset it.
Don’t allow sites to ask for your permission
Almost every website asks for your permission to use your camera, microphone, location, sound, and many more things as you can see in the screenshot above. Thankfully, Chrome allows us to adjust these settings and not allow the websites to even ask for these permissions. Go to the Permissions section in the Site Settings and adjust the settings one by one. Click on Location and check the box, ‘Don’t allow sites to see your location’. Similarly, you can change the settings for the camera, microphone, sound, etc. Once you are done with the changes, sites will automatically follow these new settings.
Additional Permissions
Under the Additional Permissions section, you can adjust the settings for motion sensors, USB devices, protocol handlers, file editing, and much more. You can change the settings by simply clicking on the tiny arrow in front of each permission.
Change settings for a particular website
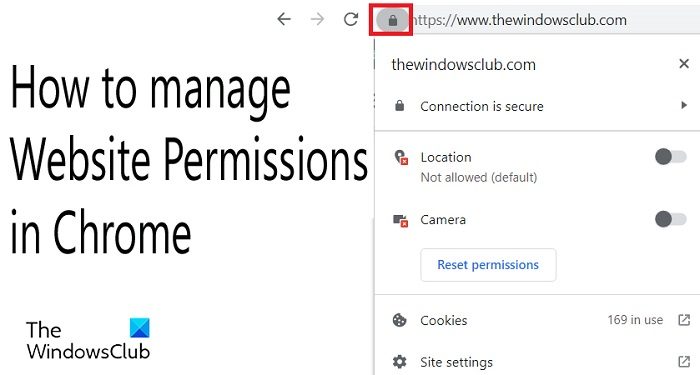
If you want to manage the permissions for any particular website, you can do that directly from the website itself. Open any website that you want to manage the permissions for and click on the small lock icon in the URL. Here you can see if the Location is allowed or not, or you can directly go to the Site Settings and check. Read: How to best protect your Privacy on the Internet.
How do I check permissions on my browser?
Click on the three dots menu on the top right corner, go to Settings > Privacy & Security > Site Settings > Permissions. Here you can check and manage all the permissions given to various websites.
Where are the site settings in Chrome?
You can go to Site Settings directly by clicking on the lock icon in your URL or can go via Settings options. Click on the Kebab menu (three dots menu) on the top right corner of Chrome and go to Settings. Under the section Privacy and Security, you will find the Site Settings.