There can be multiple reasons why you may want to change the location. The upside is, doing it pretty easy. Microsoft has a built-in policy, Modify Cache Drive, to simplify things for you.
Change Delivery Optimization Cache Drive for Windows & Store App Updates
These are two methods by which we are going to Change Delivery Optimization Cache Drive for Windows and Store App Updates in Windows 11/10. Let us talk about them in detail.
1] By Group Policy Editor
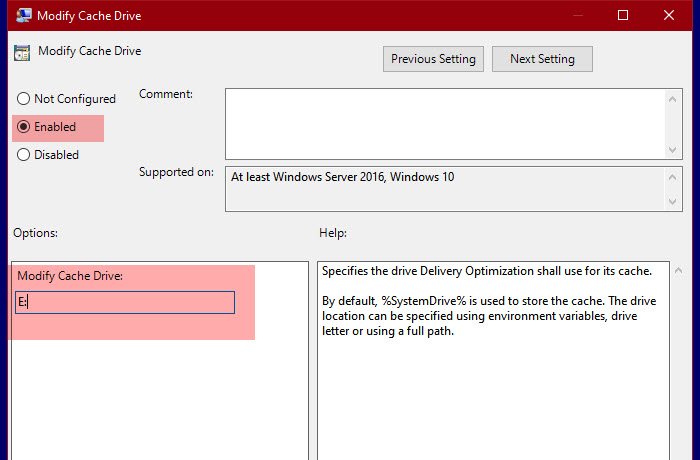
Microsoft has created a policy called Modify Cache Drive to change the location of Optimization Cache Drive. So, we are going to alter it to change the location. For that, open Group Policy Editor by searching it out from the Start Menu and navigate to the following location. Computer Configuration > Administrative Templates > Windows Components > Delivery Optimization Now, look for Modify Cache Drive, double-click on it to open the policy. Select Enabled and in “Modify Cache Drive:” section, you need to type the location where you want your cache to be stored. You can store it in any location, be it a folder, a drive, or an environmental variable. This way, you have changed your Delivery Optimization Cache Drive with Group Policy Editor.
2] By Registry Editor
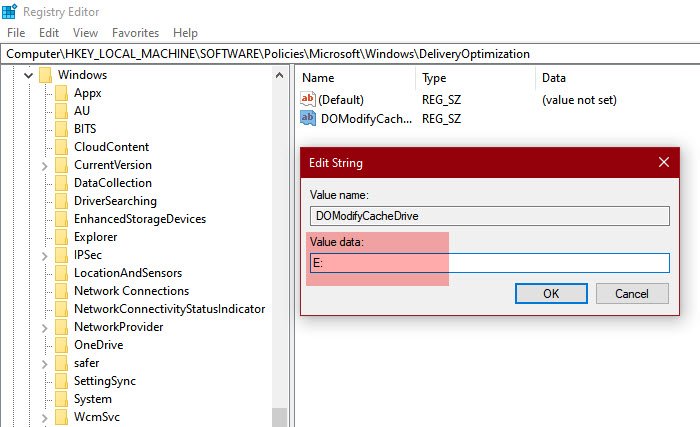
For Windows 10 Home users, Registry Editor is an alternative to Group Policy Editor. So, we are going to change the location of your Delivery Optimization Cache with it. To do that, launch Registry Editor from the Start Menu and go to the following location. If there is no DeliveryOptimization key, right-click on Windows, select New > Key, and name it “DeliveryOptimization”. Right-click on DeliveryOptimization and select New > String Value. Now, name it “DOModifyCacheDrive” and set the Value data to the location where you want your cache to be stored. This is how you can change the location of the Delivery Optimization Cache in Windows 11/10. Read Next: Change Windows Update Delivery Optimization Max Cache Age.


